Adverts
We know that contouring in makeup is very important, as it defines features and minimizes countless small imperfections, from a prominent nose to the hated double chin.
Now let's see together how contouring is done, what products you will need and what makeup is best suited to your face shape.
Adverts
DISCOVER YOUR FACE SHAPE
The first thing is to understand the shape of your face.
You should know that contouring has no fixed rules, as everyone has a face with a slightly different shape and therefore, it is essential to know yours so that the final makeup result is natural and beautiful.
Adverts
We will also explain how to contour according to the shape of your face, how to highlight parts of your face in relation to others.
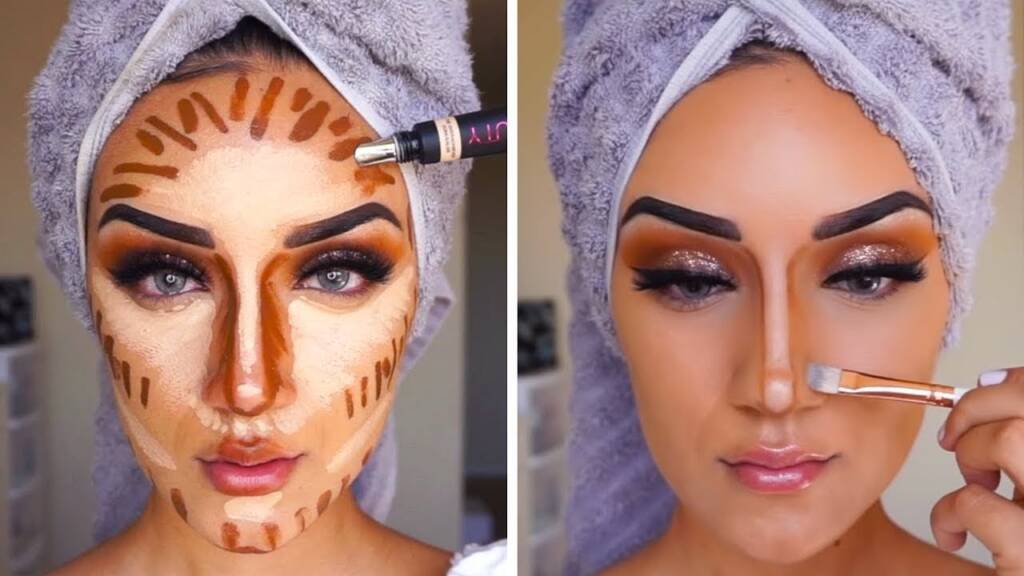
THE FIRST STEPS ARE:
Apply light foundation
Place the product in the center of the forehead, along the top line of the eyebrows, on the bridge of the nose, on the apples of the cheeks, in the center of the chin and on the cupid's bow (i.e., the area between the lips and nose).
To maintain a natural appearance, be careful not to use foundation.
If you are not used to using foundation or are not looking for a coverage texture, you can also choose to use a sheer concealer or eyeshadow, but making sure the products are cream or powder.
Apply dark foundation
Now the next step is to proceed to identify the areas of the face to be darkened.
As in the case of the points to be highlighted, the shadow areas are also different from face to face, but in principle they are the area under the hairline, the sides of the nose, the temples, the hollows of the cheeks and the sides of the jaw. .
Illuminant
To highlight your cheekbones, use a highlighting powder or cream. This type of makeup is perfect for winter, as it is in the colder months that skin tone becomes increasingly dull.
COMPLETE CONTOUR KIT:
To have a perfect contour you only need these products.
- broker
- foundation of two different colors
- a slightly darker earth than your natural complexion to create the shadows.
Avoid using glitter and bronzer, which will give your face an unnatural glow and won't go well with the rest of your makeup.
As for the highlighter, remember not to use a pearl, because less than perfect skin risks highlighting imperfections and enlarged pores.
LONG FACE CONTOURING
With necessary materials and suitable for your colors, you can start:
- Choose a good foundation for your skin
- Then spread with a compact bristle brush.
- Insist on the side edges of the face, as well as the chin and upper part of the forehead. This way you will have to make a clearer contour around the perimeter of your face, reducing its length.
- Using a sponge, Take care of the highlighted areas, paying close attention to your cheeks and don't forget to even out the products you use without leaving unwanted marks on your face.
- Finally, use a compact powder only in light areas.
RECTANGULAR FACE CONTOUR
The objective, in this face shape, is to shorten the forehead and chin, highlighting the area around the cheekbones and softening them.
- Using a darker color you will have to darken the jaws, the area under the cheekbones and the forehead.
- Be careful not to get too close to your nose and mouth, because that's where you'll need to use the marker.
- To finish the job, don't forget to highlight the upper part of your cheekbones with a blush and apply makeup to your eyes in a creative way.
ROUND FACE CONTOUR
To contour a round face, do the following:
- First you will have to take care of the “shadow areas”: with the brush, starting from the temples
- Continue along the face to the cheekbones (on both sides).
- To simplify the shape of the face, draw two symmetrical lines on the sides of the chin.
- With a warmer color, you should highlight your eyes, forehead and the tip of your chin.
- Finally, blend with a sponge, but be careful not to blend the darkest part too much, as this is exactly what will allow you to obtain a thin, slightly symmetrical face.
OVAL FACE WITH CONTOUR
To perform this makeup technique on an oval face, here's what you need to do:
- To begin with, darken the lower part of the cheekbones and near the temples, making the “cheekbones” area three-dimensional.
- Then take a brush with compact bristles, using a lighter shade, gently apply the product both along the entire length of your nose and on your forehead.
- To finish, use a flat brush and apply the highlighter to your chin, the tip of your nose and between your eyebrows.
The result will be even more natural if you can do it professionally, giving depth and shine to the face.